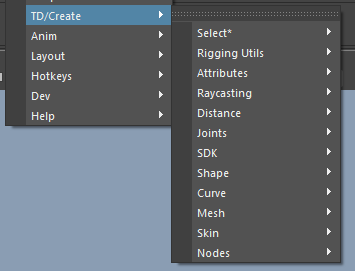
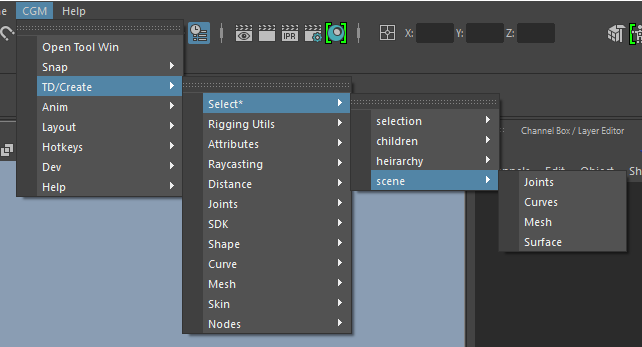
Toolbox
Status: Alpha release - August 2017
Last Updated: 09.05.2017
The cgmToolbox is a collection of many tools that may be accessed in a several ways:
- Tool Window - The easiest way to access most of the tools is through the main window and be the main part of what we'll be talking about.
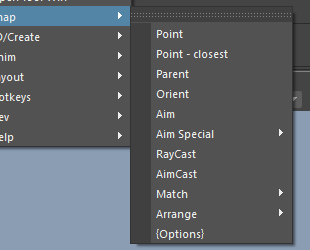
- Top menu - We'll be talking about using this method in the next sections
- Marking menu - We'll get to this later...
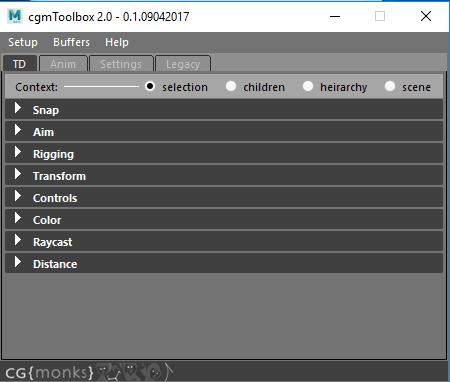
Access
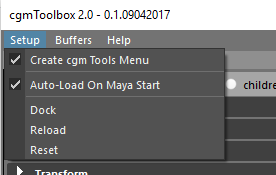
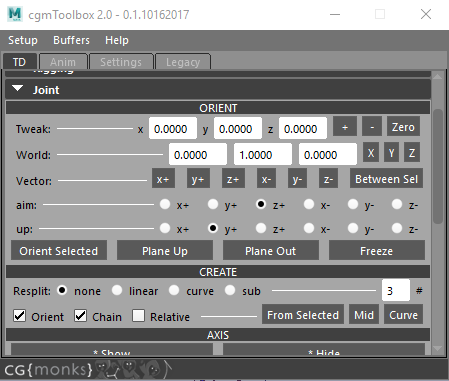
cgmTopMenu>Open Tool Win- You should see what something like the above image- Python
import cgmToolbox
cgmToolbox.ui()
TD Tab
This is a collection of tools mainly for doing td and rigging work.

Context
Some tools work with this contextual setup. They are designated in the ui/marking menu/top menu via a *.
selection- Only on selected objectschildren- Selected objects and belowheirarchy- Selected objects and their heirarchiesscene- Everything in the scene. Careful.
Rigging
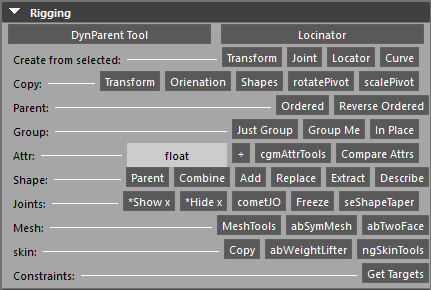
DynParent Tool- details...Locinator- details...
Create from selected
Series of options for creating objects from a selection. Works with components as well.
Transform-Joint-Locator- Locators are special. They work based off component selection and are updateable. More on that here...Curve- Instead of per object, creates a curve through selection. Points may be components.
Copy
Series or functions for copying this and that in a from>to fashion.
Transform- Copy the position and orientation.Orientation- Only the orientation.Shapes- Any shapes are appended.rotatePivot-scalePivot-
Group
Series or functions for grouping selected per selected objects. Groups are created matching the transform of their targets so objects can be zeroed for example. They are also named.
Just Group- Just the groupGroup Me- Group created, objected paretned to said group. Group is in world.In Place- Group created, and inserts itself between target and target's original parent
Attributes
[type] +- Creates a ui prompt to add a number of attributes of the selected type. Separate by,.- Left click the type to change.
- Types:
enum,string,int,float,vector,bool,message
[cgmAttrTools]-- page not doneCompare Attrs- Compares the prime node to other selected nodes. That comparison comprising seeing what attributes on the given objects match and which do not. Here's example output:
# cgm.core.lib.attribute_utils : Comparing nurbsSphere2 to nurbsSphere1... #
# cgm.core.lib.attribute_utils : Matching attrs: 199 | Unmatching: 29 #
# cgm.core.lib.attribute_utils : -------------------------------------------------------------------------- #
# cgm.core.lib.attribute_utils : attr: boundingBoxMin... #
# cgm.core.lib.attribute_utils : source: [-4.348416510705419, -1.543820107219151, 0.38805085162276876] #
# cgm.core.lib.attribute_utils : target: [-1.2264094625656805, -1.0, -1.2264094625656803] #
# cgm.core.lib.attribute_utils : attr: boundingBoxMinX... #
# cgm.core.lib.attribute_utils : source: -4.34841651071 #
# cgm.core.lib.attribute_utils : target: -1.22640946257 #
# cgm.core.lib.attribute_utils : attr: boundingBoxMinY... #
# cgm.core.lib.attribute_utils : source: -1.54382010722 #
# cgm.core.lib.attribute_utils : target: -1.0 #
# cgm.core.lib.attribute_utils : attr: boundingBoxMinZ... #
# cgm.core.lib.attribute_utils : source: 0.388050851623 #
# cgm.core.lib.attribute_utils : target: -1.22640946257 #
Control Curves
Options for creating control curves from selected objects.
Create Control Curve- Creates a control curve at each selected object utilizing stored create options. See [Toolbox Options](toolboxoptions.md) for more details.One of each- Just a way to create one of every curve type in our libraryMake resizeObj- Create a matching transform and shape from your selected objects so you can cleanly resize and shape without worrying about the rig. When you're done...Push resizeObj changes- Replace the shapes of the original object and delete our resizeObjMirror World Space To Target- Currently only works across world x{Options}- Opens the Option Window
Shape
Series of tools for working with shapes. Works with a from>to format.
Parent- Parent shape in place. This is our implementation as we foud maya's not to work well.Combine- Combine the selected shapes to the last transform.Add- Add selected shapes to the last transform.Replace- Replace the last objects shapes with the former onesExtract- Extract a specific shape from a transform. (Works best with outliner - show shapes for easy selectability)Describe- Given a selected nurbs curve, generate the code necessary to recreate it.
Joints
*Show x- Show axis (CONTEXTUAL)*Hide x- Hide axis (CONTEXTUAL)cometJO- Tool by the brilliant Michael B. Comet for orienting jointsseShapeTaper- Tool by our good friend Scott Englert for splitting sdk 'poses'
Mesh
MeshTools- page not done.abSymMesh- (Brendan Ross) Great tool for working with blendshapesabTwoFace- (Brendan Ross) Tool for splitting blendshapes
Skin
Copy- Copy the skinCluster data from first object to othersabWeightLifter- (Brendan Ross) Useful tool for retargeting/moving skinCluster data.ngSkinTools- (NOT INCLUDED) If you have the tool installed, it will launch. Otherwise it'll open the page in a browswer to get it. You should get it.
Constraints
Get Targets- Given a selected object with constraints or a constraint, select the targets of the constraints involved
Transform
This section/tool is for tweaking and pushing transform data on one node and to others. When Bokser suggested it, it made me think of Lightwave's editor but it also has a bit of Comet's influence as well.
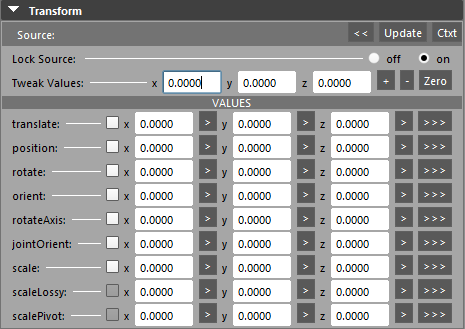
It may be accessed in the toolbox section or you can launch a separate window via the anim tab transformTools button. It is split into three sections:
- Source - This is where you load your base object with which to work and push values from/to
- Tweak - Relative adding/subtracting values
- Values - A grid of float fields expressing attributes and xform data
Source
This is where you load a source object. For editing and pushing values, something must be loaded as the source. It will auto load the first object in your selection on gui intialization or you can do it manually with the <<.
<<- Load first selected object to the sourceUpdate- Update the values section with the source objects current dataCtxt- Probably temp but shows what your active targets are that will be affected by any other buttons- Lock source - When lock source is on, the source object will not be affected by any value changes or pushes
Tweak Values
The easiest way to understand this is as a relative value +/- for any of the data rows in values.

x [ ] x [ ] z [ ]- Values to use for add/subtract.0of course does nothing.+- Add to the current value. See Values checkbox explanation for more details.-- Subract from the current valueZero- Rest the value fields and uncheck all tweak check boxes in the values section
Values
This section is for absolute value setting where Tweak is for relative. The fields fill based off the source object both on loading a source and when you press the update button.
Let's first look at the format, then each attribute/value type.

- Translate - Simple label expressing what kind of data this row is representing.
[]- Check box that couples with tweak. When you press the + for example in tweak. It checks for any rows with the check box and uses those to see what to tweak.x [ ]- Populates with the given value from attribute or xform data>- Only push this channel to targets>>>- Push all channels to targets
Now to look at what each of these rows is.
- translate - Local translation values
- position - World space position xform data.
- rotate - Local rotation values
- orient - World space rotation xform data
- rotateAxis - Attribute data
- jointOrient - Attribute data (ONLY SHOWS UP FOR JOINTS)
- scale - Local scale data
- scaleLossy - Compound scale data from parents (Not tweakable)
- scalePivot - xform data(not tweakable)
Examples
Let' take a look at a couple of examples
If you wanted to add 10 to the world position y value of a selection of objects.
- Select some objects
- Put 10 in the tweak y value field
- Check mark the position row
- Hit the
+on the tweak row
If you wanted to absolutely set the world position y value of a selection of objects
- Select some objects
- Put a 10 in the position row y value field
- Hit the
>next to that field
Controls
This section is for working with curve control creation and manipluation.
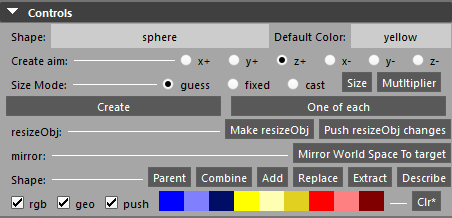
There are 4 main sections currently.
- Shape creation - Create curve shapes based off of selection
- ResizeObj - Someone we started trying a couple gigs back and find it useful
- Mirror - Still fleshing this out but should be obvious
- Shape editing - see notes in rigging section
- Control coloring - Row for basic control coloring
Shape Creation

- Create row - First we have the create type row.
Shape- If you left click this label you can specify the curve create type.Default color- The color created curves will be
- Create Aim - Aim Next we have the create aim. You specify the create objects forward with this to get created curves to snap better. The library of shapes are generally stored as z forward y up.
- Size Mode - How the created curves will be sized
- Guess - Guess based on child distance. Most useful for joints.
- Fixed - Set size. Change via the
sizebutton. - Cast -
NOT IMPLEMENTEDPlan on implementing with our raycasting stuff at some point Size- Change the fixed sizeMultiplier- Couples with Guess. If multiplier * distance to child = size
Create- ...using settings aboveOne of each- Make one of each shape type in our library so you know what they are.
Resize Obj

In short the idea here is that if you are given a rig will all kinds of wiring and you want to tweak a control that exists without just replacing the shape which we could use replace. You could of course go to component mode but the pivot for scaling can get wonky. Regardless, in short, this gives you clean shapes of the control in question on a matching transform you can scale, move or do whatever with without messing with the rig. Then you can push those changes back to the control by using our replace call. This just makes it an easy one two step.
Make resizeObj- Makes currently selected objects resize objects. This sets up the connections to handle pushing back changes and what not.Push resizeObj changes- Pushes changes back and cleans up wiring we added
Mirror

Pretty sparse for now.
Mirror World Space To Target- Only works across X now. Given two selected curves, mirrors the first to the second. Supports multi shape controls. Wrote this for a recent gig. Need to flesh out more.
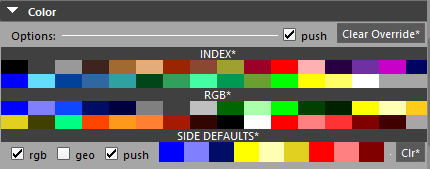
Control Coloring
Supports curves and geo both. With geo, a shader will be setup to acomplish the shader.

[] rgb- Color by rgb rather than index. If versions before 2016 this isn't usable.[] geo- When checked, geo controls will be given a shader with transparency per color setting. Note, when off surfaces wire color will be the only thing changed.[] push- Push color changes to sub shapes. If unchecked only the selected shape or transform will be affected.[][][][]...- Set color by our defaults for left, center and right / main,sub,direct styling.Clr*- Clear color overrides on selected
Raycast
We use raycasting a lot. These options affect:
- RayCast Snapping
- AimCast
- Raycast object creation in this section
- MeshTools curve casting
You can find more info about it in the corresponding knowledge section.
Buffer
When the buffer is inactive, ALL nurbs and poly surfaces in the scene are eligible cast targets. If you want to specify certain cast targets you do it here.
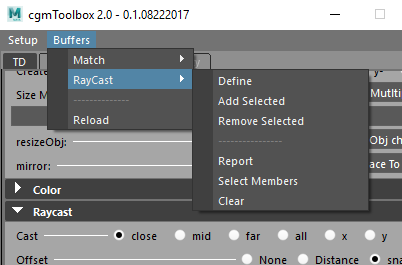
Define- Whatever is selected will now be the bufferAdd Selected- Append to the bufferRemove Selected- ...Report- Report the buffer to the script editorSelect Members- Select the bufferClear- Empty the buffer
Cast
This specifies what data is returned for the subsequent mode you're in. Note the objects actually being hit with rays can be specified with the rayCast buffer

close- Only use first impact regardless of mesh hitmid- Mid point of impactsfar- Only far hits.all- All hits.x- Creates a temporary x axis plane to cast aty- Creates a temporary y axis plane to cast atz- Creates a temporary z axis plane to cast at
Offset
None- Hit point is the position usedDistance- Fixed instance offset along normal or cast vectorsnapCast- Technique for offsetting created or snapped objects to the impact point by multiple casts. Will explain more later
Orient
None- Don't even tryNormal- Orient to the normal
Note
Not thrilled with the orient stuff yet. We'll be revisting or any contributors are welcome to take a stab at it
Set Drag Interval- Creates a uiPrompt to change the value. Drag interval sets how often to register hits during drag mode.Set offset- Creates a uiPrompt to change the value
rayCreate
Create objects with rayCasting.

Tip
You can drop rayCasting context with the q key regardless of how you started it (markingMenu, this section, etc.).
[ locator ]- Left click to change what kind of creation object you want- Locator - Locators are created such that they are updateable.
- Joint - Joint at hit point
- Joint Chain - After tool is dropped, chain will be created from locs
- Curve - After tool is dropped
- Duplicate - If you have an object selected, it will be duplicated and snapped according to other options
- vectorLine - Visual representation of raycasting. Creates two linear curves with a start and end point.
CastPoint----->ImpactImpact------->Fixed distance along mesh normal vector
- Data - Just report data in the script editor
Create- Starts a dragContext in which you can click in the viewport to create objects at points of intersection per mouseclickDrag- Same as create but will continue to create as long as the button is pressed and at the interval specified
Distance
Requires at least two selected objects to do anything. First object selected is source. Curves, mesh and surfaces are suported. If target objects have multiple shapes, all shapes are checked.

Distance
[0.0000]- Float field that is updated when distance is measuredMeasure- Measure the disance between all selected objects, add them, and update the float field to make it easy to copy
Vector
x[] y[] z[]- Float fields that is updated when vector is measuredMeasure- Measure the vector between two objects, add them, and update the float field to make it easy to copy
Near
Object- Closest object of seleted objects to the first.Shape- Closest shape of selected object's shapes to the first transformSurface Point- Closest point on selected objects...Surface Loc- Closest point loc'd...Surface Nodes- Wired nodes per shape and result loc...
Far
Object- Furthest...Shape- ....
Anim Tab
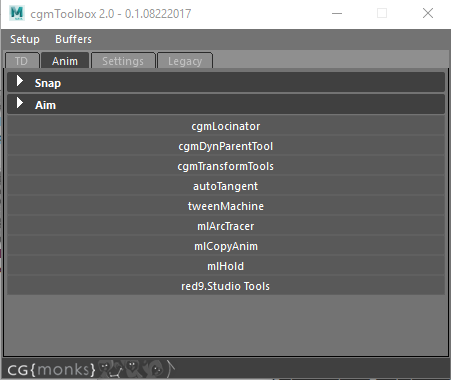
Snap Section- Mirrored section from td tab. See more...Aim Section- Mirrored section from td tab. check it out...cgmLocinator- Tool for setting up snapping objects and baking that data while animating. Details...cgmDynParentTool- Tool for setting up space switches. See morecgmTransformTools- Open a separate window with the transform sectionautoTangent- Michael ComettweenMachine- Justin BarrettmlArcTracer- Morgan LoomismlCopyAnim- Morgan LoomismlHold- Morgan Loomisred9.Studio Tools- Setup red9 tools. They are packaged with our tools. Great stuff.
Settings Tab
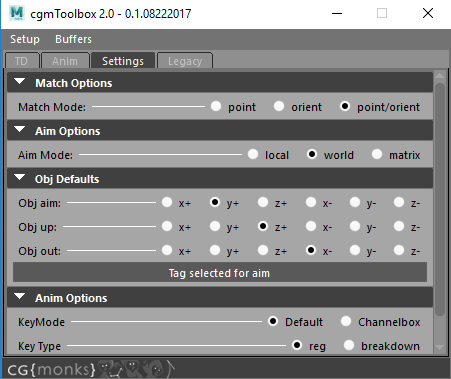
The things in the settings tab iteract with our optionVar setups that most of our tools access. Most of these things are accessible in the marking menu but it's tedious changing settings there. Thus we moved it here.
Match
This if for snapping accessed via marking menu or top.
Mode
point- Position onlyorient- Rotation onlypoint/orient- Position and rotation
Aim
Mode
local- Use local vector based on object defaults OR stored aiming optionsworld- Use world vectormatrix-IN DEVELOPMENTBokser is playing around
Object Defaults
Because assumptions are often wrong.
Obj Aim
The local aim axis for vector work
Obj Up
The local up axis for vector work
Obj Out
The local out axis for vector work. Out is rarely used and may be deprecated.
RayCast
Cast
close- Only use first impact regardless of mesh hitmid- Mid point of impactsfar- Only far hits.all- All hits.x- Creates a temporary x axis plane to cast aty- Creates a temporary y axis plane to cast atz- Creates a temporary z axis plane to cast at
Offset
None- Hit point is the position usedDistance- Fixed instance offset along normal or cast vectorsnapCast- Technique for offsetting created or snapped objects to the impact point by multiple casts. Will explain more later
Orient
None- Don't even tryNormal- Orient to the normal
Note
Not thrilled with the orient stuff yet. We'll be revisting or any contributors are welcome to take a stab at it
Set Drag Interval- Creates a uiPrompt to change the value. Drag interval sets how often to register hits during drag mode.Set offset- Creates a uiPrompt to change the value
Anim Options
Key ModeDefault- Maya default of keying everything keyableChannelbox- Prioritizes channel box attribute selection so if you have obj1 and obj2 selected and tx selected in the channel box. The following would be keyed: [obj1.tx,obj2.tx]
Key Type- Keys set by default via marking menu can be reg or breakDown typeReset Mode-Default- All keyable attributes will be resetTransform Atts- Only keyable transform attributes will be set:translate,rotate,scale
Legacy Tab
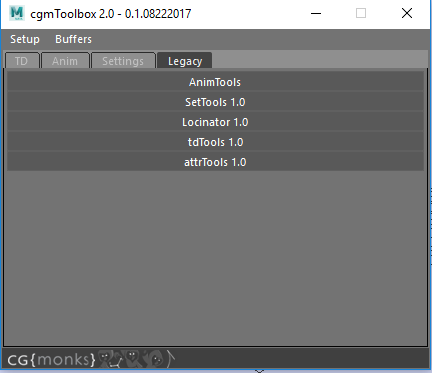
AnimTools- Old standalone collectionSetTools 1.0- Will be rewriting soonLocinator 1.0- Old version. Like the new one but not as neat.tdTools 1.0- Old version of this. Still a few tools we need to migrate.AttrTools 1.0- Old version. New one is in alpha. Docs not done.
